-
안드로이드 코틀린 : 리사이클러뷰 ( RecyclerView )프로그래밍/Android(Kotlin) 2020. 6. 23. 23:07반응형
안녕하세요, 랴파파입니다!
요즘 저는 안드로이드 어플을 제작해보고자 공부를 하고 있는 중입니다.
인터넷 & 서적을 통해 모은 정보를 통해 간단한 예제 프로그램을 만들어보고,
블로그에 정리해서 계속 포스팅을 할 예정입니다.
오늘은 첫 번째 정리로 아래와 같은 프로그램을 만들 예정입니다.
다 같이 차근차근 따라와 보시죠!
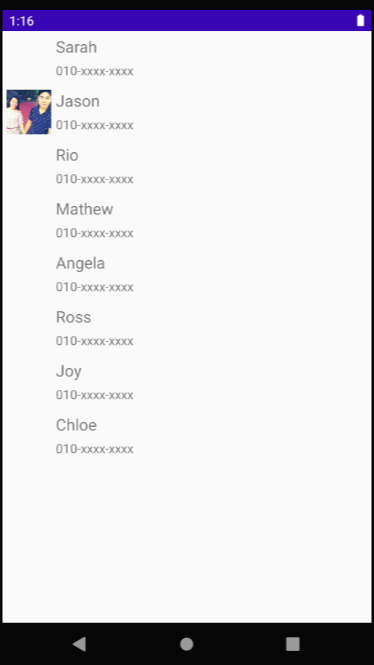
리사이클러뷰를 통해 구성한 예제 프로그램 1. 라이브러리 ( Library ) 추가
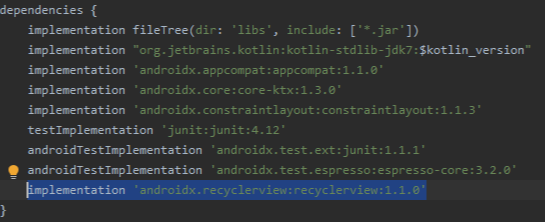
먼저 < build.gradle(Module:app) >에서 < implementation 'androidx.recyclerview:recyclerview:1.1.0' > 입력하시고 오른쪽 상단에 표시되는 < Sync Now >를 눌러서 리사이클러뷰를 사용할 수 있도록 설정해주시기 바랍니다.
2. 레이아웃 ( Layout ) 구성
위의 라이브러리 추가를 완료하셨으면 이제 각각의 사람의 정보를 입력할 단일 레이아웃을 만들어보도록 하겠습니다. 위의 예제 프로그램의 사진에서는 아래의 사진과 같은 단일 레이아웃을 8개를 사용하여 친구 리스트를 도출한 것을 보실 수 있습니다.

사람의 정보를 담는 단일 레이아웃 단일 레이아웃에 대한 XML Code는 아래와 같습니다.
파일명 : list_friends.xml
<?xml version="1.0" encoding="utf-8"?>
<LinearLayout xmlns:android="http://schemas.android.com/apk/res/android"
    android:layout_width="match_parent"
    android:layout_height="60dp">

    <ImageView
        android:layout_width="50dp"
        android:layout_height="50dp"
        android:layout_marginTop="5dp"
        android:layout_marginLeft="5dp"
        android:id="@+id/xml_lstfrd_img_profile"/>

    <LinearLayout
        android:layout_width="wrap_content"
        android:layout_height="wrap_content"
        android:orientation="vertical"
        android:layout_marginTop="5dp"
        android:layout_marginLeft="5dp">

        <TextView
            android:layout_width="wrap_content"
            android:layout_height="wrap_content"
            android:layout_marginBottom="5dp"
            android:id="@+id/xml_lstfrd_txt_name"
            android:text="Name"
            android:textSize="18dp"/>

        <TextView
            android:layout_width="wrap_content"
            android:layout_height="wrap_content"
            android:id="@+id/xml_lstfrd_txt_phoneno"
            android:text="Phone Number"/>

    </LinearLayout>

</LinearLayout>
두 번째로 위의 단일 레이아웃을 다수 사용하여 친구 리스트를 도출하는 메인 액티비티의 레이아웃을 살펴보도록 하겠습니다. 해당 레이아웃의 XML Code는 아래와 같습니다.
파일명 : activity_main.xml
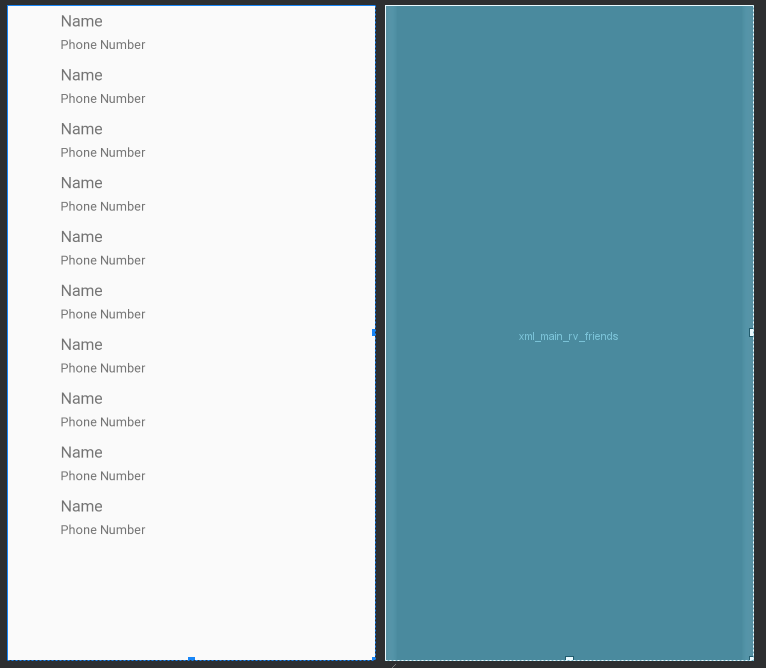
<?xml version="1.0" encoding="utf-8"?>
<LinearLayout
    xmlns:android="http://schemas.android.com/apk/res/android"
    xmlns:app="http://schemas.android.com/apk/res-auto"
    xmlns:tools="http://schemas.android.com/tools"
    android:layout_width="match_parent"
    android:layout_height="match_parent"
    tools:context=".MainActivity">

    <androidx.recyclerview.widget.RecyclerView
        android:layout_width="match_parent"
        android:layout_height="match_parent"
        android:id="@+id/xml_main_rv_friends"
        app:layoutManager="androidx.recyclerview.widget.LinearLayoutManager"
        tools:listitem="@layout/list_friends"/>

</LinearLayout>
참고로 맨 마지막의 < tools:listitem="@layout/list_friends" > 부분이 존재함으로 안드로이드 스튜디오 개발환경에서 아래와 같이 < list_friends.xml > 파일을 적용한 예시를 바로 확인하실 수 있습니다.
3. 코틀린 소스코드 ( Kotlin Source Code ) 구성
먼저 < list_friends.xml >에 들어갈 사람의 정보 ( 사진, 이름, 전화번호 )를 저장할 클래스를 정의하도록 하겠습니다.
package com.rainman.ishida.ui_recyclerview

import android.graphics.drawable.Drawable

class DataFriends (val imgProfile:Drawable?, val strName:String, val strPhoneNo:String) {
}
두 번째로 < activity_main.xml >과 < list_friends.xml >을 이어주는 어댑터 클래스를 정의하도록 하겠습니다.
package com.rainman.ishida.ui_recyclerview

import android.view.LayoutInflater
import android.view.View
import android.view.ViewGroup
import android.widget.Toast
import androidx.recyclerview.widget.RecyclerView
import kotlinx.android.synthetic.main.list_friends.view.*

class RecyclerAdapterFriends(private val items: ArrayList<DataFriends>) :
    RecyclerView.Adapter<RecyclerAdapterFriends.ViewHolder>() {

    override fun getItemCount(): Int = items.size

    override fun onBindViewHolder(holder: RecyclerAdapterFriends.ViewHolder, position: Int) {
        val item = items[position]
        val listener = View.OnClickListener {it ->
            Toast.makeText(it.context, "Clicked:"+item.strName, Toast.LENGTH_SHORT).show()
        }
        holder.apply {
            bind(listener, item)
            itemView.tag = item
        }
    }

    override fun onCreateViewHolder(parent: ViewGroup, viewType: Int): RecyclerAdapterFriends.ViewHolder {
        val inflatedView = LayoutInflater.from(parent.context).inflate(R.layout.list_friends, parent, false)
        return RecyclerAdapterFriends.ViewHolder(inflatedView)
    }

    class ViewHolder(v: View) : RecyclerView.ViewHolder(v) {
        private var view: View = v
        fun bind(listener: View.OnClickListener, item: DataFriends) {
            view.xml_lstfrd_img_profile.setImageDrawable(item.imgProfile)
            view.xml_lstfrd_txt_name.text    = item.strName
            view.xml_lstfrd_txt_phoneno.text = item.strPhoneNo
            view.setOnClickListener(listener)
        }
    }
}
마지막으로 메인 액티비티 클래스를 정의하도록 하겠습니다.
package com.rainman.ishida.ui_recyclerview

import androidx.appcompat.app.AppCompatActivity
import android.os.Bundle
import kotlinx.android.synthetic.main.activity_main.*

class MainActivity : AppCompatActivity() {

    override fun onCreate(savedInstanceState: Bundle?) {
        super.onCreate(savedInstanceState)
        setContentView(R.layout.activity_main)

        val list = ArrayList<DataFriends>()
        list.add(DataFriends(null,"Sarah","010-xxxx-xxxx"))
        list.add(DataFriends(getDrawable(R.drawable.jykim)!!,"Jason","010-xxxx-xxxx"))
        list.add(DataFriends(null,"Rio","010-xxxx-xxxx"))
        list.add(DataFriends(null,"Mathew","010-xxxx-xxxx"))
        list.add(DataFriends(null,"Angela","010-xxxx-xxxx"))
        list.add(DataFriends(null,"Ross","010-xxxx-xxxx"))
        list.add(DataFriends(null,"Joy","010-xxxx-xxxx"))
        list.add(DataFriends(null,"Chloe","010-xxxx-xxxx"))

        val adapter = RecyclerAdapterFriends(list)
        xml_main_rv_friends.adapter = adapter
    }
}
이것으로 리사이클러뷰를 이용한 친구 리스트 도출해 볼 수 있었습니다.
오늘 글도 여러분께 많은 도움이 됐기를 희망합니다.
감사합니다!
반응형'프로그래밍 > Android(Kotlin)' 카테고리의 다른 글
안드로이드 코틀린 : SharedPreferences (1) 2020.07.03 안드로이드 코틀린 : 파이어베이스 페이스북 로그인 ( Firebase Authentication : Facebook Login ) (1) 2020.07.01 안드로이드 코틀린 : 파이어베이스 구글 로그인 ( Firebase Google Login ) (1) 2020.06.30 안드로이드 코틀린 : 프래그먼트 ( Fragment ) & Bottom Navigation View (1) 2020.06.29 안드로이드 코틀린 : 파이어베이스 리모트 컨피그 ( Firebase Remote Config ) (0) 2020.06.28